Friday, December 23, 2016

After my last Christmas craft sale, it was nice to do some crafting for myself and even then it wasn't for me - I made a record number of handmade cards. Somehow I was just super organized instead of being super behind. "Late for this year, early for next" was my motto! I even made 45 flat cards for my co-workers and that's the subject of today's blog.

So, so many bells!
Cardmaking is often not a spontaneous thing. Most of the time people see the end product, not the sketches, colour sampling or model. To figure out how I was going to pull off the flat cards, I had to quickly check and see how many bell shapes would fit on a 12x12" sheet of cardstock so my Pazzles could be a pretty good holiday helper! Then I had to find a rubber stamp sentiment that would fit the space as well as make sure that the bell shape would fit the diagonal line background stamp I had in mind. Oh, and I also had to make sure that I had coordinating ink as well!

I really wanted to impress my co-workers with crisp machine drawn text but ran into a snag halfway through. The old style pen tool for my Pazzles only holds certain size pens and out of the millions of pens and markers hanging around the house, none were really in colours that matched! Half of them were machine drawn anyway, so that was a huge time saver.

Bells were made in every colour. I cut and stamped one sheet a night and soon the pile of bells grew! The night before I gave them out, I fired up Netflix and threaded gold metallic floss through each one. Originally I wanted to string Hershey's kisses on each bell, but that quickly turned into a tangled mess!

If you want to deliver holiday cheer to your co-workers next year, here are the supplies I used for 45ish cards:
  • bell SVG /Pazzles cutting file
  • sentiment stamp from Stampin' Up Christmas Pines set
  • diagonal stripe background stamp from Stampin' Up
  • 8 sheets of 12x12" cardstock in green, red, coral, orange, light blue, grey and pink
  • 4 sheets of letter sized white or vanilla paper (12 sentiments to a page)
  • ink pads in green, red, coral, orange, light blue, grey and pink (I use Stampin' Up because it matches with the paper)
Have fun!

Sunday, October 16, 2016

2016 Christmas Craft Fairs

I'm feeling pretty proud of myself because I'm finally ahead of things, not behind. Here's where you can find me this Christmas craft sales season in Calgary. Along with MasterCard and Visa payments, I can now take Interac payments too. Come out and say hi and shop local!

October 22, 10-4pm
St. Brigid Fall Craft Fair
730 Citadel Way NW, Calgary, Alberta T3G 5S6
Facebook for more info
November 11, 11-5pm
Fort Calgary Annual Artisans' Fair
750 9 Ave SE, Calgary, Alberta T2G 5E1
Facebook for more info
November 18 and 19
Thorncliffe Greenview Craft Fair
5600 Centre Street North, Calgary, Alberta T2K 0T3
Facebook for more info
December 2 and 3
HHAC Christmas Craft Sale and Tea
10099 Harvest Hills Blvd NW, Calgary, Alberta T3K 4W9
Facebook for more info


If I'm not in your area, check out CalgaryCraftSales.com to find a sale near you!

Sunday, October 2, 2016

Calgary Mini Maker Faire 2016


I gotta get better at writing about events before they happen! But with the preparing, packing, printing and promoting, the peace and place to pontificate doesn't often happen.

I jumped at the chance to be part Of the Calgary Mini Maker Faire when I saw the ad on Facebook. I had previously attended Maker Faire but had never thought I would have something to show off. Then I remembered the presentation that I did for my fibre class about knitting machines. I have three of them! With this realization, an idea was born and I applied.

When the acceptance email came through, I was super jazzed. Time to prep! As the big weekend approached, I became kind of nervous. What if people thought that knitting machines were no fun? What if no one wanted to talk to me? I would be sitting there all day Facebooking or something.

I had no reason to worry - the table was immensely popular. It was just me manning the table and I had lots of people of all ages who wanted to take a try at the knitting machines. I had brought a dozen balls of yarn and it wasn't enough. Despite all my planning, I didn't guess that some would like to make and take something on the knitting machine.

By the second day I was starting to lose my voice and I had to change the table up so that only I was using the knitting machine :D As they say, you don't know what you don't know and if I return next year I will bring Mom or a friend so I can look at the other exhibits.Fortunately the volunteers and organizers made the whole event run so smoothly that it was a great experience all around. Maybe I will even have a different idea too!


Friday, September 9, 2016

New horse scherenschnitte on Etsy

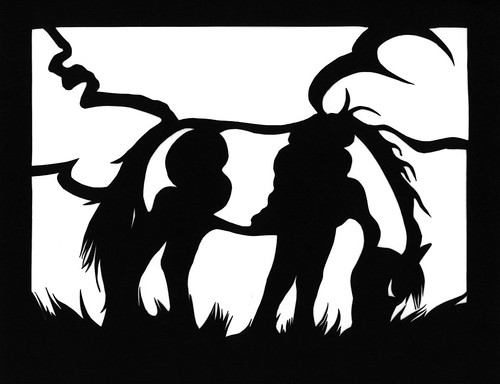
It's seems like it wasn't all that long ago that I was drawing some new papercuts - but it last November was a long time ago! I found the half finished piece for this grazing horse and quick finished it up. It is cut from black cardstock and mounted to white cardstock. There were a few hairy moments when I was cutting the mane and clouds. It is so easy to snip these off by accident. The picture is sale on Etsy.
Grazing mare papercut

Friday, August 19, 2016

New Cuttable Files on Etsy

It's been a busy summer! I finally got organized enough to make a bunch of new cuttable or cutting files for digital die cutting machines for Etsy. I have a Pazzles, but Cricut and Silhouette are two other popular brands. And with third party software like Make the Cut, digi crafters aren't limited to certain file types like days of yore! It's kind of cringe-worthy to think that the original Cricut came with cartridges...you couldn't use your own designs back then.

Fortunately, times have changed and there are all sorts of designy people out there like me who are happy to share their designs. So far I have some frames, birds and feathers. We'll see how the collection grows.

Each cutting file package comes with a PDF, an SVG file and a WPC file for Pazzles. Even if you don't have a digital die cutter, you can use the SVG to scale the pictures to size, or you can do it the old fashioned way with a photocopier with the PDF. Sometimes I forget that you can use a cutting machine to draw too. Clip art, embroidery patterns, laser cutting, stencils...cuttable files have tons of uses :-)

Thursday, July 7, 2016

I Used to Draw Like This

I posted this on Facebook last week. My friend and framer Ljubica came over to deliver a picture and while chatting about art, this and that, I pulled out an old watercolour from high school.


It was good for a laugh! You can see that I liked Breyers as well as horses a lot back then! It made me a little sad too - even back then art programs were pretty underfunded. We did most of our projects on manila paper and it was almost always watercolour. Manila paper is a poor quality choice - it doesn't hold water very well - and, well, it's off white! Occasionally we did get real watercolour paper or a Fredrix canvas, but I was kind of disappointed by how little I learned about drawing, technique or materials. I sense this is why a lot of people never practice art - they figure that just because they were not good at it then, they never will be. Chances are they just didn't have good instruction or materials :)

Tuesday, July 5, 2016

3 Easy Ways to Cut Tissue Paper for Crafts

Every now and then I enjoy making a craft video. I am by no means a pro at it, but each one gets a little better every time. There are so many factors such as audio, lighting, camera positioning and complaining cockatiels :-D

I finally made a title card after noticing that some craft videos have some pretty snazzy introductions. I made a black & white drawing, cleaned it up in Corel Photo Paint and then converted it to a vector image in CorelDraw so the colours could be changed easily.

Inspiration came from a video that suggested putting the camera tripod on top of the desk. It's hard to craft with a tripod between you and your hands, so this worked well, except the video is upside down and rotating it can look funny. Time to do things the left handed way until I get a fancier set up :-D

I'm pleased to show off this technique for cutting tissue paper. I figured it out back in spring when making a card for my friend Always Artistic and taking photos just didn't seem to do. Take a look and let me know if this is a technique that you would like to try as well!